Next: QT Widget Up: *使用 QT 設計 KDE Previous: gtk+ 開發環境建立 Contents DYWANG_HOME
Q_OBJECT 巨集(macro),即 Q_OBJECT 必須出現在類別定義中。
# MyWindow 繼承類別 QMainWindow,提供應用程式的主要視窗功能。
# 若需要一個對話窗,要繼承 QDialog。
class MyWindow : public QMainWindow
{
  Q_OBJECT
  public:
    MyWindow();
    virtual ~MyWindow();
  signals:
    void A_Signal();
# signals A_Signal() 沒指定參數
  private slots:
    void doSomething();
# slots doSomething() 沒指定參數
}
A_Signal() 信號:
emit A_Signal();
bool QObject::connect (const QObject * sender, const char * signal,
                       const QObject * receiver, const char * member)
# connect 函式要傳入擁有信號的物件(傳送者)、信號函式、擁有 slot 的物件(接收者)及 slot 名稱。

connect (button, SIGNAL(clicked()), this, SLOT(doSomething()));
# this 在此代表 MyWindow
void MyWindow::doSomething()
{
  // Slot code
}
#include <qmainwindow.h>
class ButtonWindow : public QMainWindow
{
  Q_OBJECT
  public:
    ButtonWindow(QWidget *parent = 0, const char *name = 0);
    virtual ~ButtonWindow();
  private slots:
    void Clicked();
};
ButtonWindow::ButtonWindow(QWidget *parent, const char *name)
: QMainWindow(parent, name)
{
# setCaption 是 QMainWindow 的成員函式,可設定視窗標題。
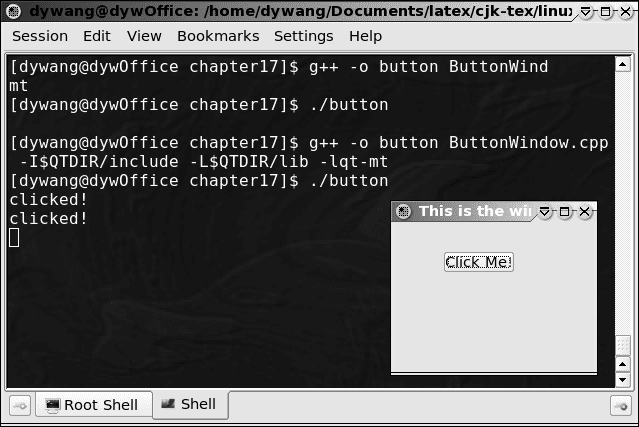
this->setCaption("This is the window Title");
# 產生按鈕、將按鈕的 clicked 信號連結到 Clicked() slot 中。
QPushButton *button = new QPushButton("Click Me!", this, "Button1");
# 設定按鈕的幾何大小。
button->setGeometry(50,30,70,20);
# 將按鈕的 clicked signal 連結到 Clicked() slot 中。
connect (button, SIGNAL(clicked()), this, SLOT(Clicked()));
}
~ButtonWindow 解構函式
ButtonWindow::~ButtonWindow()
{
# Qt 自動管理 widget 的解構工作,所以解構函式是空的。
}
void ButtonWindow::Clicked(void)
{
  std::cout << "clicked!\n";
}
#include  "ButtonWindow.moc"
#include  <qpushbutton.h>
#include  <qapplication.h>
#include  <iostream>

int main(int argc, char **argv)
{
  QApplication app(argc,argv);
# 產生一個 ButtonWindow 的物件,設定應用程式的主視窗,並將視窗顯示在螢幕上。
  ButtonWindow *window = new ButtonWindow();
# 設定應用程式的主視窗。
  app.setMainWidget(window);
# 將視窗顯示在螢幕上。
  window->show();
  return app.exec();
}
$ moc ButtonWindow.h -o ButtonWindow.moc

# Qt 的 MOC( Meta-Object System )
## 標準的 C++ 無法提供 signal/slot 連結所需 之 meta 訊息。
## 標頭檔若包含 \verb|Q_OBJECT| 巨集,MOC 會解析巨集定義,
## 並產生 Qt meta-object 相關的 C++ 程式碼。
## 使用 qmake 產生 Makefile,就會包括 moc 的使用。
$ g++ -o button ButtonWindow.cpp -I$QTDIR/include -L$QTDIR/lib -lqt-mt
QPushButton::QPushButton(const QString &text, QWidget *parent,
                               const char* name=0 )
# QLayout 的 parent 參數,可以是 widget 或其他的 QLayout。
QVBoxLayout::QVBoxLayout (QWidget *parent, int margin,
                             int spacing, const char *name)
QVBoxLayout::QVBoxLayout (QLayout *parentLayout, int spacing,
                             const char * name)
QVBoxLayout::QVBoxLayout (int spacing, const char *name)
QBoxLayout::addWidget (QWidget *widget, int stretch = 0,
                           int alignment = 0 )
QBoxLayout::addLayout (QLayout *layout, int stretch = 0)
#include <qmainwindow.h>
class LayoutWindow : public QMainWindow
{
  Q_OBJECT
  public:
    LayoutWindow(QWidget *parent = 0, const char *name = 0);
    virtual ~LayoutWindow();
};
#include <qapplication.h>
#include <qlabel.h>
#include <qlayout.h>
#include "LayoutWindow.moc"
LayoutWindow::LayoutWindow(QWidget *parent, const char *name) :
QMainWindow(parent, name)
{
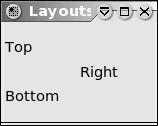
this->setCaption("Layouts");
# 因為不能直接將 QLayout 加到 QMainWindow,所以產生一個假的 QWidget。
QWidget *widget = new QWidget(this);
setCentralWidget(widget);
QHBoxLayout *horizontal = new QHBoxLayout(widget, 5, 10,
“horizontal”);
QVBoxLayout *vertical = new QVBoxLayout();
QLabel* label1 = new QLabel("Top", widget, "textLabel1" );
QLabel* label2 = new QLabel("Bottom", widget, "textLabel2");
QLabel* label3 = new QLabel("Right", widget, "textLabel3");
vertical->addWidget(label1);
vertical->addWidget(label2);
horizontal->addLayout(vertical);
horizontal->addWidget(label3);
resize( 150, 100 );
}
LayoutWindow::~LayoutWindow()
{
}
int main(int argc, char **argv)
{
QApplication app(argc,argv);
LayoutWindow *window = new LayoutWindow();
app.setMainWidget(window);
window->show();
return app.exec();
}
$ moc LayoutWindow.h -o LayoutWindow.moc
$ g++ -o layout LayoutWindow.cpp -I$QTDIR/include -L$QTDIR/lib -lqt-mt