Next: 選單和工具列 Up: *使用 QT 設計 KDE Previous: QT Widget Contents DYWANG_HOME
#include <qdialog.h>
MyDialog::MyDialog(QWidget *parent, const char *name) :
QDialog(parent, name)
{
  QHBoxLayout *hbox = new QHBoxLayout(this);
  hbox->addWidget(new Qlabel("Enter your name"));
  hbox->addWidget(new QLineEdit());
  hbox->addWidget(ok_pushbutton);
  hbox->addWidget(cancel_pushbutton);
  connect (ok_pushbutton, SIGNAL(clicked()), this, SLOT(accept()));
  connect (cancel_pushbutton, SIGNAL(clicked()), this,
                             SLOT(reject()));
}
MyDialog *dialog = new MyDialog(this, "mydialog");
if (dialog->exec() == QDialog::Accepted)
{
  // User clicked ‘Ok’
  doSomething();
}
else
{
  // user clicked ‘Cancel’ or dialog killed
  doSomethingElse();
}
delete dialog;
MyDialog::MyDialog(QWidget *parent, const char *name) :
QDialog(parent, name)
{
  ...
  connect (ok_pushbutton, SIGNAL(clicked()), this, SLOT(OkClicked()));
  connect (cancel_pushbutton, SIGNAL(clicked()), this,
           SLOT(CancelClicked()));
}
MyDialog::OkClicked()
{
  //Do some processing
}
MyDialog::CancelClicked()
{
  //Do some other processing
}
MyDialog *dialog = new MyDialog(this, "mydialog");
dialog->show();
#include <qmessagebox.h>
int information (QWidget *parent, const QString &caption,
                 const QString &text,
                 int button0, int button1=0, int button2=0)
int warning     (QWidget *parent, const QString &caption,
                 const QString &text,
                 int button0, int button1, int button2=0)
int critical    (QWidget *parent, const QString &caption,
                 const QString &text,
                 int button0, int button1, int button2=0)
QMessageBox::Ok
QMessageBox::Cancel
QMessageBox::Yes
QMessageBox::No
QMessageBox::Abort
QMessageBox::Retry
QMessageBox::Ignore
int result = QMessageBox::information(this,
             "Engine Room Query",
              "Do you wish to engage the HyperDrive?",
             QMessageBox::Yes | QMessageBox::Default,
             QMessageBox::No | QMessageBox::Escape);
switch (result) {
  case QMessageBox::Yes:
     hyperdrive->engage();
     break;
  case QMessageBox::No:
    // do something else
    break;
}

#include <qinputdialog.h>
QString getText   (const QString &caption, const QString &label,
                  QLineEdit::EchoMode mode=QLineEdit::Normal,
                  const QString &text=QString::null, bool * ok = 0,
                  QWidget * parent = 0, const char * name = 0)
QString getItem   (const QString &caption, const QString &label,
                  const QStringList &list, int current=0,
                  bool editable=TRUE,
                  bool * ok=0, QWidget *parent = 0, const char *name=0)
int getInteger    (const QString &caption, const QString &label,
                  int num=0,
                  int from = -2147483647, int to = 2147483647,
                  int step = 1,
                  bool * ok = 0, QWidget * parent = 0,
                  const char * name = 0)
double getDouble (const QString &caption, const QString &label,
                  double num = 0,
                  double from = -2147483647, double to = 2147483647,
                  int decimals = 1, bool * ok = 0,
                  QWidget * parent = 0,
                  const char * name = 0 )
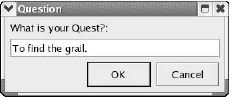
bool result;
QString text = QInputDialog::getText("Question",
                                        "What is your Quest?:",
                                        QLineEdit::Normal,
                                        QString::null, &result, this,
                                        "input" );
if (result) {
   doSomething(text);
} else {
// user pressed cancel
}
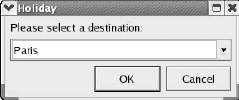
bool result;
QStringList options;
options << "London" << "New York" << "Paris";
QString city = QInputDialog::getItem("Holiday",
                                      "Please select a destination:",
                                       options, 1, TRUE, &result,
                                      this, "combo");
if (result)
  selectDestination(city);
TARGET = app
MOC_DIR = moc
OBJECTS_DIR = obj
INCLUDEPATH = /usr/include/kde
QMAKE_LIBDIR_X11 += /usr/lib
QMAKE_LIBS_X11 += -lkdeui -lkdecore
SOURCES = main.cpp window.cpp
HEADERS = window.h
$qmake file.pro -o Makefile